0. Перш за все – зібрати логи за допомогою hayabusa з усіх контролерів домену та робочих станцій (Важливо це зробити відразу, щоб не насмітити в логи іншими інструментами) – команда:
|
1 |
hayabusa-2.12.0-win-x64.exe csv-timeline --live-analysis -o %computername%.csv -w |
1. Зібрати для доменів звіт PingCastle
2. Включити PowerShell Logging
3. Включити поглиблений аудит
4. Перевірити можливість оновлення операційних систем (та оновити ОС)
5. Перевірити наявність Sysmon та його конфігурацію. Якщо немає – встановити Sysmon з конф.файлом від SwiftOnSecurity
6. Перевірити на SIEM чи збираються логи сервіса Sysmon
7. Зібрати звіти THOR . Швидше за все буде Mimikatz. Якщо є – передати інформацію для формування звіту
8. Перевірити налаштування аудиту з допомогою HardeningKitty
|
1 2 |
Import-Module .\HardeningKitty.psm1 Invoke-HardeningKitty |
9. PersistenceSniper . Швидше за все будуть Narratory та схожа дічь. Якщо є – передати інформацію для формування звіту
|
1 2 |
Import-Module .\PersistenceSniper.psd1 Find-AllPersistence |
10. Попередній мітігейшн – Enable NLA
Довідково –
Enable NLA
Computer Configuration -> Administrative Templates -> Windows Components -> Remote Desktop Services -> Remote Desktop Session Host -> Security -> Require user authentication for remote connections by using Network Level Authentication = Enabled
11. Встановити ESET, якщо це дозволено правилами (https://support.eset.com/en/kb6864-deploy-the-eset-management-agent-using-a-group-policy-object-windows-8x9x#deploy)
12. Опціонально – Пройтись по системам Microsoft Safety Scanner та Trend Micro Anti-Threat Toolkit
13. Перевірити PingCastle звіт.
14. Disable WDigest, Disable Guest Account, Disable reversible encryption for all users, відновити політики до початкового стану, включити LSA protection
Довідково –
Prevent WDigest from storing clear-text passwords in memory
HKLM\SYSTEM\CurrentControlSet\Control\SecurityProviders\WDigest – UseLogonCredential = 0Відновлення політик:
* To reset the Domain GPO, type
dcgpofix /target:Domain
* To reset the Default DC GPO, type
dcgpofix /target:DC
* To reset both the Domain and Default DC GPOs, type
dcgpofix /target:bothDisable reversible encryption for all users
Computer Configuration -> Windows Settings ->Security Settings -> Account Policies -> Password Policy -> Store password using reversible encryption for all users in the domain = DisabledDisable SMBv1 with PowerShell
Re-enable SMBv1 with PowerShell
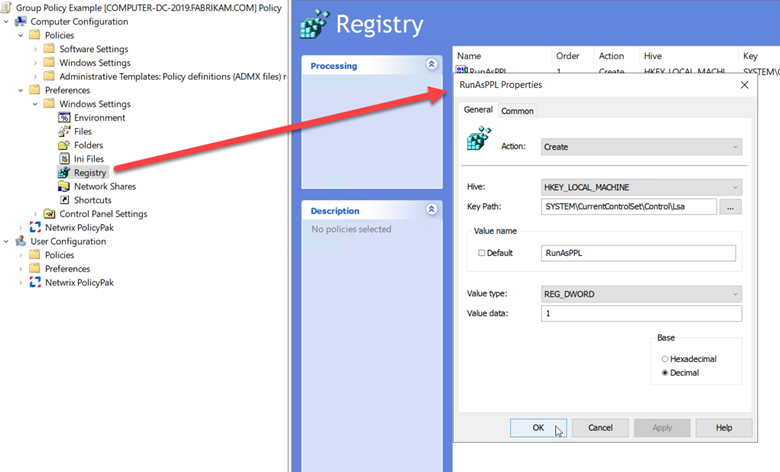
Enable LSA protection by using Group Policy
1. Open the GPMC by entering gpmc.msc in the Run dialog box or selecting Group Policy Management Console from the Start menu.
2. Create a new GPO that’s linked at the domain level or linked to the organizational unit that contains your computer accounts. Or, select a GPO that’s already deployed.
3. Right-click the GPO, and then select Edit to open the Group Policy Management Editor.
4. Expand Computer Configuration > Preferences > Windows Settings.
5. Right-click Registry, point to New, and then select Registry Item. The New Registry Properties dialog box appears.
6. In the Hive list, select HKEY_LOCAL_MACHINE.
7. In the Key Path list, browse to SYSTEM\CurrentControlSet\Control\Lsa.
8. In the Value name box, type RunAsPPL.
9. In the Value type box, select REG_DWORD.
10. In the Value data box, type:
– 00000001 to enable LSA protection with a UEFI variable.
– 00000002 to enable LSA protection without a UEFI variable, only enforced on Windows 11 version 22H2 and later.
11. Select OK.
15. Перевірити Sec Providers на контролерах домену (https://www.elastic.co/guide/en/security/current/potential-lsa-authentication-package-abuse.html) Можливо, допоможе PersistenceSniper
16. Перевірити зайві сервіси (SSH – якщо є – спробувати відключити. Перевірити дашборд доступності).
17. Перевірити на SIEM чи збираються логи сервіса SSH
18. Перевірити статус файєрвола на DC
19. Перевірити користувачів на наявність SID history
|
1 |
(Get-aduser -filter * -properties sidhistory | Where sidhistory) та, за необхідності, почистити історію (Get-ADUser USERNAME -properties sidhistory | foreach {Set-ADUser $_ -remove @{sidhistory=$_.sidhistory.value}}) |
20. Перевірити дозволи на папці SYSVOL
|
1 2 3 4 5 6 7 8 9 10 11 12 13 14 15 |
$BadPrincipal = "Everyone" $GoodPrincipal = "Authenticated Users" $SMBShareBP = Get-SMBshare | Get-SmbShareAccess | Where-Object {$_.AccountName -eq "$BadPrincipal"} $SMBShare = $SMBShareBP.Name If ($SMBShareBP -eq $Null) { Write-Host "*******No Share has $BadPrincipal in the Security for the Share.*******" -ForegroundColor Cyan } Else { ForEach ($Share in $SMBShare) { Grant-SmbShareAccess -Name $SMBShare -AccountName $GoodPrincipal -AccessRight Read -Confirm:$false | Revoke-SmbShareAccess -Name $SMBShare -AccountName $BadPrincipal -Force Write-Host "*******$SMBShare Share has had $BadPrincipal Removed and $GoodPrincipal Added as Read only.*******" -ForegroundColor Green } } |
21. Замінити всі паролі (включаючи krbtgt – 2 рази)
22. Додати адмінів в Protected Users
22. Встановити та сконфігурувати LAPS
23. Додатково – скрипт по експорту правил локального FireWall в CSV файл –
|
1 2 |
get-netfirewallrule | Get-NetFirewallPortFilter | select-object Protocol, LocalPort, RemotePort, InstanceID, CreationClassName | export-csv "C:\path\to\script\output-PORTS_Filtered.csv" |
Updated:
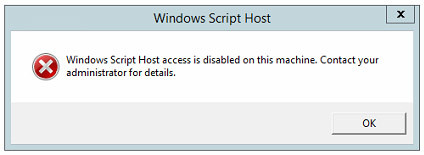
How to prevent VBS files from running
Here are the steps to be taken to disable the Windows Script Host (WSH) functionality for the current user (step 2-3) and / or for all users (steps 4-5):
1.Press the WINDOWS + R keys, then type regedit to open the system registry in edit mode.
2. Navigate to HKEY_CURRENT_USER\Software\Microsoft\Windows Script Host\Settings\
3. Create (if it doesn’t exist already) a new REG_DWORD key, call it Enabled and assign a value of 0 (zero) to it.
4. Navigate to HKEY_LOCAL_MACHINE\Software\Microsoft\Windows Script Host\Settings\
5. Create (if it doesn’t exist already) a new REG_DWORD key, call it Enabled and assign a value of 0 (zero) to it.
 To bring back such functionality you just need to delete the Enabled registry key (or change its value to 1).
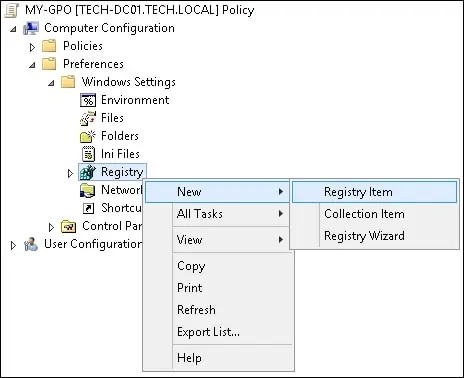
Computer Configuration > Preferences > Windows Settings > Registry
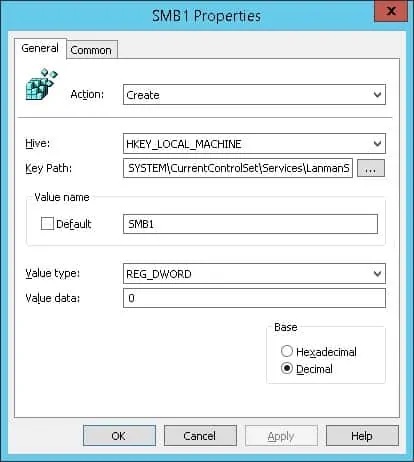
On the registry Window, perform the following configuration.
• Action: Create
• Hive: HKEY_LOCAL_MACHINE
• Key Path: SYSTEM\CurrentControlSet\Services\LanmanServer\Parameters
• Value name: SMB1
• Value type: REG_DWORD
• Value data: 0
Click on the OK button.
Remove administrative shares
To remove administrative shares and prevent them from being automatically created in Windows, follow these steps:
• Select Start, and then select Run.
• In the Open box, type regedit, and then select OK.
• Locate, and then select the following registry subkey: HKEY_LOCAL_MACHINE\SYSTEM\CurrentControlSet\Services\LanmanServer\Parameters\AutoShareServerNote –
• The registry subkey AutoShareServer must be set as type REG_DWORD. When this value is set to 0 (zero), Windows does not automatically create administrative shares. Be aware that this does not apply to the IPC$ share or shares that you create manually.
• On the Edit menu, select Modify. In the Value data box, type 0, and then select OK.
• Exit Registry Editor.
• Stop and then start the Server service.
Two lines that can save your AD from a crisis
Two simple PowerShell commands will enable you to set accidental deletion protection on all objects in your Active Directory. The first command will set this on any users or computers (or any object with value user on the ObjectClass attribute). The second command will set this on any Organizational Unit where the setting is not already enabled.
|
1 2 |
Get-ADObject -filter {(ObjectClass -eq "user")} | Set-ADObject -ProtectedFromAccidentalDeletion:$true Get-ADOrganizationalUnit -filter * | Set-ADObject -ProtectedFromAccidentalDeletion:$true |
ListDefenderExclusions.ps1
|
1 2 3 4 5 6 7 8 |
Write-Host "List ExclusionPaths:" Get-MpPreference | Select-Object -ExpandProperty ExclusionPath Write-Host "List ExclusionExtensions:" Get-MpPreference | Select-Object -ExpandProperty ExclusionExtension Write-Host "List ExclusionIpAddresses:" Get-MpPreference | Select-Object -ExpandProperty ExclusionIpAddress Write-Host "List ExclusionProcesses:" Get-MpPreference | Select-Object -ExpandProperty ExclusionProcess |